I came across a neat trick when looking into taking registry backups and would like to share what I found. This trick will work on Windows 7 and later operating systems.
First a little background. Let's take a look at the folder that the registry resides in and the core registry files (DEFAULT, SAM, SECURITY, SOFTWARE, SYSTEM):
%systemroot%\system32\config
There is one folder in particular that we are interested in:
%systemroot%\system32\config\RegBack
We can see that the RegBack folder is a copy of each of the registry hives. This is really cool because it allows us have at least one good copy of the registry that we can use to restore in case Windows gets to a state where it is unable to boot.
The question now is, how does this get backed up? There is a hidden scheduled task:
"\Microsoft\Windows\Registry\RegIdleBackup"
This is the task responsible for taking the snapshot that is saved in the RegBack folder. The problem is, this task in only scheduled to run once every 10 days. Some people might want to run it more often, or be able to run it on demand. Here is how to do it:
Open CMD as administrator
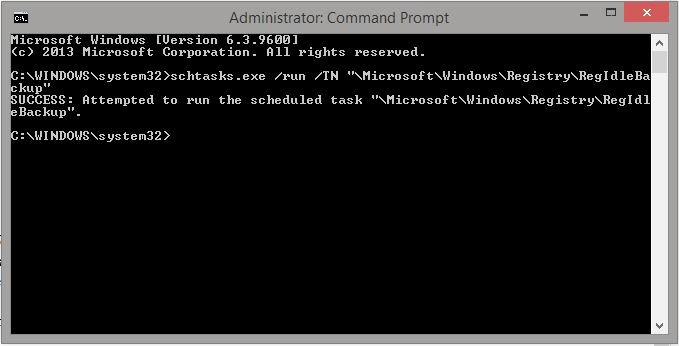
Type the following command:
schtasks.exe /run /TN "\Microsoft\Windows\Registry\RegIdleBackup"
Now you have a current snapshot of the registry! This can be restored manually from any PE environment that allows access to the file system.
Monday, December 16, 2013
Wednesday, November 14, 2012
FBI Online Agent
Another day, another screenlocker. These things are getting on my nerves...
This is a fairly straight-forward removal process.
- Reboot the PC into Safe Mode with Networking by repeatedly pressing the 'f8' key at the top of the keyboard until you get to the "Advanced Boot Options" menu
- Hold down Windows Key + R to get the run box open
- Clear out the text inside the run box and type "regedit.exe" (without the quotes), click "Ok"
- Navigate to the following key: HKLM\Software\Microsoft\Windows\CurrentVersion\Run
- Look for an exe running from the following folder:
%userprofile%\Local Settings\Application Data\Microsoft\Windows\912\WSManHTTPConfig.exe
Keep in mind, the above exe name (WSManHTTPConfig.exe) and the folder that it is stored in (912 in my case) changes with each installation. I have underlined the part that changes with each installation.
All we need to do now is navigate to the folder and remove the exe itself. Here is how to do that:
- Open up the run box again the same way we did above.
- Type "control folders" (without the quotes) and click "Ok"
- Navigate to the "View" tab
- Tick "Show hidden files, folders, drives"
- UnTick "Hide Protected Operating System Files"
- Open the run box again
- Type "%userprofile%" (without the quotes) and click "Ok"
- Navigate to "Local Settings\Application Data\Microsoft\Windows\"
- Find the folder that was marked in the registry key that you found above (912 in my case)
- Delete that folder entirely (be careful not to delete any others, open the folder to be sure it is correct)
- Repeat steps 1-5 but tick the opposites (Hide files again)
- Run a malware scanner on the PC to ensure that you are rid of any leftovers
Wednesday, August 1, 2012
Using Hiren's BootCD for Remote Support
Hiren's BootCD is used for various fixes that we need to perform outside of the Windows environment. It is an extremely useful set of tools and can be used for a wide variety of repair operations that would otherwise need a technician to have physical access to the PC. This tutorail is designed to give a general idea of what the BootCD can be used for when doing remote support, and to show you how to perform repiars using the BootCD.
When should we send the BootCD out? If the PC is unable to boot, but the client gets an error message, it is time to send the CD out. These error messages include:
- Blue Screens
- File Missing (such as hal.dll, c:\windows\system\config, etc)
- Operating system not Found
- the system boots to a blinking cursor in the upper-left hand corner
- and especially boot loops (unless you are in Vista/7, then follow my blog post)
- the client gets the error "Unmountable boot volume"
- when the PC cannot boot any further than the BIOS screen
So in a nut shell, if the PC can see AND access the hard drive, a BootCD would be useful for our remote repairs.
Booting Up Hiren's BootCD (Mini Windows XP)
Once the client has the BootCD, the PC needs to be configured to boot from the CD/DVD drive as the first device in the list. Since every BIOS is different, that is up to you to work out. Once configured properly, go ahead and boot the PC. We want to select "Mini Windows XP" from the first splash screen:
This usually takes about 5 mins to boot all the way up, depending on the speed of the PC. Once booted, the screen looks like this:
Network support is already started by default. If the internet connection is hardwired, internet access takes no extra configuration. If the internet connection is wireless, the "Wireless Setup" Icon on the first screen will take you here:
Once here, the wireless adapter will need to be selected form the dropdown menu, then we will need to go into the "Wifi" tab and select the correct wireless network. This process is fairly straight-forward. Once internet is connected, we are able to get our remote connection via our "internet" icon in the lower-left hand corner of the desktop.
Repairing the Master Boot Record (MBR)
One of the most common reasons that Hiren's BootCD is sent out is for boot loops. When repairing the MBR, MbrFix is the most reliable tool. When opening up the BootCD menu, MbrFix can be found in Partition/Boot/MBR > Commandline > MbrFix:
As the menu selection implies, MbrFix is a command line tool. Use of the tool to fix a Windows XP MBR looks like this:
MbrFix /drive 0 fixmbr
This assumes that the disk that we want to repair the MBR on is mounted as disk 0. This can be checked using:
MbrFix /drive 0 listpartitions
For repairing Vista/7 MBR, my other blog post is recommended. In the event that the BootCD is needed, we can repair the MBR in these other operating systems using the associated switches:
MbrFix /drive 0 fixmbr /vista
MbrFix /drive 0 fixmbr /win7
That's it! Finish up any other tasks that we need to do before reboot, then reboot the PC and we should be able to boot the OS now.
Repairing the file system (chdksk)
When using Hiren's BootCD, the command prompt looks a bit different then when a PC is booted normally in Windows. The command prompt is usually set to the BootCD's file system (X:\). To perform various operations such as chkdsk on the system drive, the syntax just has to be changed around a bit. Open up command prompt and set your chkdsk command up like this:
chkdsk c: /x
Editing Startup Processes (Autoruns)
When using Hiren's BootCD to repair the MBR or fix severe malware, editing startup entries can be beneficial before rebooting the OS back into Windows. To do this, we need to open Autoruns from the Hiren's Menu > Startup > AutoRuns:
When Autoruns loads, we will notice that it loads the default Hiren's startup info. We want to view/edit the startup info from the offline system. We now need to go to file > Analyze Offline System...
Next Autoruns will ask us to select the Windows directory of the offline system, as well as the user profile that we want to load. By default, just selecting the Windows directory will automatically load the default user profile. Since we want to make sure our client's profile is clear of malware, we need to find the "ntuser.dat" for the profile that we want to manipulate, then point the "User Profile" section to the folder that contains that file. In the example below, the user profile that I want to edit is the "Administrator" profile.
That's it! Now that Autoruns is loaded with the offline system, we can make the necessary changes to our startups.
Restoring the Registry (Reg Restore Wizard)
Sometimes we may find ourselves in a situation where we need to roll back some registry changes that were recently made and system restore is failing. In this case, as long as the PC has restore points available, we can use the Registry Restore Wizard. This will not do exactly what system restore does (since system restore restores some files as well), but if we need to roll back changes to the registry only, this is our tool. To open it, from the Hiren's BootCD menu > Registry > Registry Restore Wizard:
The next step in this process is to select the Windows directory of the offline PC that we want to restore.
Once we have selected our Windows directory, we should see a list of restore points. Select the restore point for the corresponding date that we want to restore to, then click next.
Registry Restore Wizard will then do the rest of the work and restore the registry. If our window looks like this after the operation has completed, then the restore was successful.
That's it! Reboot the PC and verify that the issue has been resolved.
Editing an Offline Registry (Registry Editor PE)
There are some times when we will need to manually edit the offline registry. This can be done using the Registry Editor PE. To open the Registry Editor PE, open up the Hiren's BootCD Menu > Registry > Registry Editor PE
We will then be asked to load the remote Windows directory. Locate the directory like this:
Next we need to select our remote hives individually. They should all be located in the "C:\Windows\System32\Config" folder. Select each one by simply clicking "Open" when each new window pops up:
Now we need to load our offline users. After all, we cannot edit an offline user profile without loading it right? We need to manually locate the ntuser.dat file that is located in the root of the userprofile that we want to load.
In my case, the account that I want to edit is the Administartor account. So i locate the ntuser.dat here:
Since we have an offline registry loaded, we need to edit different areas of the registry than we usually would. Keep in mind that Hiren's BootCD has it's own registry settings that are also loaded. We will find our target registry keys start with "_REMOTE_". If we came across a time that we needed to import a .reg file to the offline registry, the "_REMOTE_" will need to be appended into the .reg file before importing.
A regular .reg file will look like this:
Windows Registry Editor Version 5.00
[HKEY_LOCAL_MACHINE\SOFTWARE\Microsoft\.NETFramework]
"InstallRoot"="C:\\Windows\\Microsoft.NET\\Framework64\\"
"Enable64Bit"=dword:00000001
A .reg file that has been modified correctly for a remote registry import will look like this:
Windows Registry Editor Version 5.00
[HKEY_LOCAL_MACHINE\_REMOTE_SOFTWARE\Microsoft\.NETFramework]
"InstallRoot"="C:\\Windows\\Microsoft.NET\\Framework64\\"
"Enable64Bit"=dword:00000001
To edit the user profile, instead of it being located in HKEY_CURRENT_USER, it will now be located under HKEY_USERS. Below is a screenshot illustrating the different remote locations in Registry Editor PE:
That's it! We can now edit the offline registry and make all necessary adjustments.
Resetting a Windows Password (NTPWEdit)
There are some cases where a client forgets their Windows password. In these cases we have some really convenient tools that help quickly edit the user account passwords for Windows. To open NTPWEdit, got to the Hiren's BootCD Menu > Passwords/Keys > Windows Login > NTPWEdit:
Next we will need to select our remote SAM hive. NTPWEdit will usually open right up to the correct folder that contains that SAM hive. If it does not, the SAM hive is located in the "C:\windows\system32\config" folder in the offline Windows hard drive:
Once the SAM hive has been loaded, the options are fairly straight-forward. We select the offline user account that we want to modify, then enter the new password or unlock the account in the case of Vista/7 hidden Administrator accounts:
That's it! The password has been changed and we should be able to log in to the user account with our new password.
That is the end of our tutorial for now, if you would like to request a tutorial on any other tools/fixes that you come across for the Hiren's BootCD, please email me and I will add to it.
Tuesday, July 24, 2012
Gimemo: Another FBI Ransomware
This one looks almost exactly like Reveton, which I have posted about before, the behavior is a bit different though. Gimemo is capable of starting in safe mode so it makes removal just a bit trickier. The best way to remove this is always to do a system restore. If you do not have restore points, you can follow the instructions for manual removal below.
To perform the system restore method, reboot the PC and repeatedly tap the "f8" key at the top of the keyboard to get to the "Advanced Boot Options" menu. Select "Safe Mode with Command Prompt". Once it loads and gives you the command prompt, type "rstrui.exe" and follow the on-screen instructions for system restore.
If you have no restore points or are like me and want to do things the hard way :), you can also remove it manually. To do this, get into safe mode with command prompt using the instructions above. Once there we need to delete the exe files. Type the command "explorer.exe" which will bring up a folder to allow you to navigate through the file system.
Find "%appdata%\<random.exe> and delete it
Run the following command:
reg add HKCU\Software\Microsoft\Windows\CurrentVersion\Policies\System /v "DisableTaskMgr" /t REG_DWORD /d 0
Now you can reboot into normal mode and at least be able to do something. Once booted into normal mode, you may notice that you do not see your start menu, that gets fixed next, but the point is that now we can get some work done inside the PC. So open taskmgr using the key combination [Ctrl + Shift + Esc].
Go to File > New Task(Run) and type "iexplore.exe". You now have IE open, you want to download autoruns. Open autoruns once you have it downloaded. Delete all the values that have been marked in yellow:
Once you do all that, you can reboot the PC and explorer will launch correctly. You will notice that you are still missing all of the icons, and all of the files on the "C:\" drive are still hidden. Here is what to do about that:
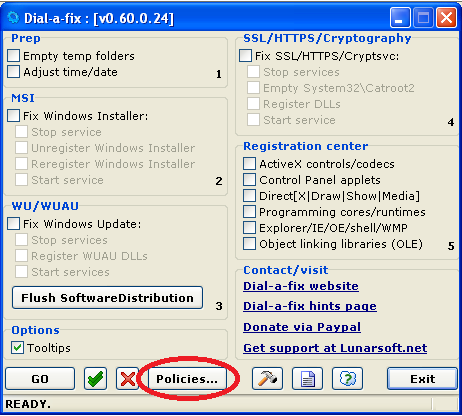
Download Dial-A-Fix. If you are in Vista/7 you can use it still by running in compatibility mode for XP sp3. Launch DAF and go to the policies section. Remove all of the policies that have been found and restart the PC again.
That will enable your registry tools. Now open regedit, make sure you are at the top part ("computer") and go to edit > find. Type "nodesktop" into the search box.
Delete what you find:
Still in taskmgr, go to file > new task (run) > Type "explorer.exe" which will bring up your start menu again. Making sure that the start menu is up, right-click on the desktop > Arrange Icons By > Show Desktop Icons. You should now see your desktop icons. At this point, a malware scanner should be run to ensure that there are no other infections on the PC. My favorite, as always, is MalwareBytes' Anti-Malware. A quick scan should be good enough in this case. That's it! Ransomware removed!
Thursday, July 5, 2012
Repairing the MBR in Vista/7
I have found that more and more often, I have to perform a repair on the MBR when removing some of the new bootkits from x64 platforms. It is a pretty straight-forward process, which Microsoft has documented well. I feel that putting it all in one place will help people out, so here it is:
The first step towards repairing the MBR is to get into the "Advanced Boot Options" screen by repeatedly pressing the "f8" key on the keyboard just after powering the system on. That will take you here:
Select "Repair Your Computer", wait for everything to load, select your keyboard layout and login. Once you login, you will see this screen:
If you run into an error with "bootrec /fixboot" or "bootrec /rebuildbcd" that states "element not found", it means that the OS partition is not set as active and you need to do that before running the fixes. For this example, I will be using diskpart to fix this error and set the correct partition to the active state. Here is a list of the commands and a short breakdown of what they do:
diskpart - launches the diskpart utility
list disk - lists the hard disks that are available, you need the OS disk (usually the c:\ drive)
select disk x - once you find the disk you want to select, replace x with the correct disk number
list partition - lists the partitions that are available, you need the OS partition (usually the biggest one)
select partition x - once you find the OS partition, replace x with the correct partition number
active - sets the currently selected partition to active
exit - exit diskpart back to recovery console
Once you have the correct partition set as active, you can retry the bootrec commands and they should succeed this time. That is all there is to it!
The first step towards repairing the MBR is to get into the "Advanced Boot Options" screen by repeatedly pressing the "f8" key on the keyboard just after powering the system on. That will take you here:
Select "Repair Your Computer", wait for everything to load, select your keyboard layout and login. Once you login, you will see this screen:
You want to select "Command Prompt". Now that you have command prompt open, you can start fixing the MBR. Please follow the commands below in order:
bootrec /fixboot
bootrec /fixmbr
bootrec /rebuildbcd
If all worked correctly, your screen will look like this:
diskpart - launches the diskpart utility
list disk - lists the hard disks that are available, you need the OS disk (usually the c:\ drive)
select disk x - once you find the disk you want to select, replace x with the correct disk number
list partition - lists the partitions that are available, you need the OS partition (usually the biggest one)
select partition x - once you find the OS partition, replace x with the correct partition number
active - sets the currently selected partition to active
exit - exit diskpart back to recovery console
Once you have the correct partition set as active, you can retry the bootrec commands and they should succeed this time. That is all there is to it!
Tuesday, July 3, 2012
FBI Ransomware
This infection is called Reveton and is classified as Ransomware. It locks the screen in normal mode and tells you that if you pay some money ($100 US) in the form of a MoneyPak to unlock the PC. This can be defeated very easily. First, you need to boot into safe mode so that the rogue does not launch. Next, locate the startup folder in your start menu and look for a shortcut marked "ctfmon". This file has the same icon as the real ctfmon, but launches a shortcut that looks like this:
%systemroot%\system32\rundll32.exe C:\users\<UserName>\AppData\Local\Temp\er_00_0_1.exe
Just delete the shortcut and the exe located in the temp folder and that part has been taken care of. Several of these infections have had a rootkit installed on the system as well. The one that I have seen the most with it is SST. SST has recently been updated and TDSSKiller no longer finds it when scanning with normal parameters. You should always run TDSSKiller with the "Detect TDLFS" option checked when working on a PC that has Reveton.
Make sure that you have the option pictured above checked before running the scan. You will see a result that looks like this:
Select the "delete" option once you have found this and reboot. Run the scan again to ensure that the rootkit has been removed entirely. If it has not, repeat the above steps until it is gone.
Saturday, March 31, 2012
ZeroAccess x64 consrv.dll
The consrv.dll infection has picked up a partner recently.
There is now a service that is paired with both the 32 and 64-bit version of
zaccess. We are able to see the infection easily on 64-bit already just by
searching for the dll via the start menu, now we can verify with TDSSKiller.
As
always, this is the time to create a system restore point. It is not advisable
to continue forward without creating a restore point.
Open up
the registry editor and navigate to: HKEY_LOCAL_MACHINE\SYSTEM\Select.
We want to look for the value "Default" - Do not confuse this with
the one on top which is "(Default)". This value will tell us which
control set will be loaded the next time Windows boots up. The "Current" value tells us which of the control sets are currently loaded. In my case, ControlSet002 is currently loaded (this will be different on each different PC). The rootkit is watching the current control set to ensure that no changes are made to it. This makes ControlSet002 impossible to modify, so I need to modify the other one. For example, If ControlSet002 is loaded, I need to modify either ControlSet001 or ControlSet003. If ControlSet001 is loaded, I need to modify either ControlSet002 or ControlSet003, etc.
We will now navigate to:
HKEY_LOCAL_MACHINE\SYSTEM\ControlSet003\Control\Session
Manager\SubSystems
The value that we are interested in here is the
"Windows" value. It may or may not be modified. Here is what the data
will look like with an active infection:
%SystemRoot%\system32\csrss.exe
ObjectDirectory=\Windows SharedSection=1024,20480,768 Windows=On
SubSystemType=Windows ServerDll=basesrv,1
ServerDll=winsrv:UserServerDllInitialization,3
ServerDll=consrv:ConServerDllInitialization,2 ServerDll=sxssrv,4
ProfileControl=Off MaxRequestThreads=16
The key should look like this when it is clean:
%SystemRoot%\system32\csrss.exe ObjectDirectory=\Windows SharedSection=1024,20480,768 Windows=On SubSystemType=Windows ServerDll=basesrv,1 ServerDll=winsrv:UserServerDllInitialization,3 ServerDll=winsrv:ConServerDllInitialization,2 ServerDll=sxssrv,4 ProfileControl=Off MaxRequestThreads=16
The key should look like this when it is clean:
%SystemRoot%\system32\csrss.exe ObjectDirectory=\Windows SharedSection=1024,20480,768 Windows=On SubSystemType=Windows ServerDll=basesrv,1 ServerDll=winsrv:UserServerDllInitialization,3 ServerDll=winsrv:ConServerDllInitialization,2 ServerDll=sxssrv,4 ProfileControl=Off MaxRequestThreads=16
We are
particularly interested in the ServerDll part of this data. You may notice that
the order of the ServerDll data (if you omit the other data) is: basesrv, winsrv, consrv, sxssrv. We
want to change it back to the default configuration which is: basesrv, winsrv, winsrv, sxssrv. Once
you have changed the data, click ok and then press f5 on your keyboard to
refresh your view of the registry. Open the value back up to make sure that it
was not changed back by the rootkit. If it was, you will have to try another
control set such as ControlSet001. If your changes were successful, we can
refer to this control set as "fixed", go to the key: HKEY_LOCAL_MACHINE\SYSTEM\Select. We
will now change the "Default" value's data to match our
"fixed" control set, mine is ControlSet003 so my "Default"
value's data will be changed to "3".
I recommend that you familiarize your self with the NT startup process to get a better understanding of what we are doing here and why. A good source of reading to better understand how this all works can be found here at wikipedia in the "Loading Windows NT Kernel" section of this article:
We can
now delete C:\Windows\system32\consrv.dll.
The next step is to handle the service, we will need to open up a notepad and take a look at our TDSSKiller window again. Copy the name of the service into the notepad and then copy that to your clipboard. Open up your registry editor and make sure that 'Computer' is selected in the left pane. Go to Edit > Find and paste the service that you just copied into the find box. Click 'find next' and you should arrive at
HKEY_LOCAL_MACHINE\SOFTWARE\Microsoft\Windows NT\CurrentVersion\Svchost
We are looking for the service listed in the 'netsvcs' value. Find the line that contains the service and delete that line only. Then press the 'f3' key on your keyboard to continue the search. You should get either 1 or 2 more results. Once you find the service registry keys, delete the entire key. Press 'f3' until you see the message "Finished searching through the registry." Close the registry editor and reboot. Run a full scan with MalwareBytes' Anti-Malware to remove any remaining files.
HKEY_LOCAL_MACHINE\SOFTWARE\Microsoft\Windows NT\CurrentVersion\Svchost
We are looking for the service listed in the 'netsvcs' value. Find the line that contains the service and delete that line only. Then press the 'f3' key on your keyboard to continue the search. You should get either 1 or 2 more results. Once you find the service registry keys, delete the entire key. Press 'f3' until you see the message "Finished searching through the registry." Close the registry editor and reboot. Run a full scan with MalwareBytes' Anti-Malware to remove any remaining files.
A link to the html format of this video can be found here
Unzip the folder and launch the html file that is contained inside.
Sunday, March 4, 2012
Windows Telemetry Center
Windows Telemetry Center has been renamed quite a few times. Here are some of the other names:
This one in particular does not have any type of activation code. However, the sample that I tested was older, so there are activation codes that work with the newer iterations. Here is one of them thanks to Xylitol:
0W000-000B0-00T00-E0020
This one is a bit harder to remove if you do not activate it. I had trouble with MalwareBytes' in particular, it kept freezing during removal. The best way that I found to remove this one is using Hitman Pro 3.6. Here are the links to this tool:
For 32-Bit: http://dl.surfright.nl/HitmanPro36.exe
For 64-Bit: http://dl.surfright.nl/HitmanPro36_x64.exe
I found that running Hitman in Breach Mode was the way to go. To do this, you need to hold down the Ctrl key on your keyboard, and then double-click to open the program. You will see your explorer shell disappear and Hitman will be the only thing on the screen. Let it scan and remove. You will need to do a supplemental scan with MalwareBytes' after Hitman does his job.
Registry Keys (list shortened for relevance):
HKLM\SOFTWARE\Microsoft\Windows NT\CurrentVersion\Image File Execution Options\a.exe (about 750 of these)
HKCU\SOFTWARE\Microsoft\Windows\CurrentVersion\Policies\System | DisableRegedit
HKCU\Software\Microsoft\Windows\CurrentVersion\Run | Inspector
Files:
C:\WINDOWS\system32\at.exe
C:\WINDOWS\system32\cmmon32.exe
C:\Documents and Settings\<User>\Application Data\Protector-<random>.exe
Subscribe to:
Posts (Atom)